Tuesday, September 21, 2010

• Create a development SharePoint 2010 Environment on Windows 7 Part 2:

• Creating a development environment for SharePoint 2010 is much easier now with two options, you can deploy SharePoint foundation on Windows 7 or deploy your environment on a virtual machine. In any case, these steps will guide you through the process:

• First you will need a x64 laptop or (desktop) with at least 2 GB RAM (I suggest 4 considering that you will be running Visual Studio as well)

• The process is not that complicated but it must be done in the exact sequence otherwise you will get errors in different steps during the installation.
• Here are the steps in order:
• Follow the steps in my previous post here
• You will need to download the SharePoint.exe file for Microsoft SharePoint Foundation (WSS 4) from here
• We will need to change a line in the install configuration file so we start by extracting the SharePoint.exe file using the command prompt as follows:
• Go to the search box in windows and type command prompt
• Right-mouse the command prompt link and click the Run as an administrator


• In order to extract the installation files to C:\SharePoint FoundationExtract – You can name the extract folder anything you like but I used this name as an example. Type the following command in the command prompt window:

SharePointFoundation.exe /extract:c:\SharePointextract
Now all the installation files are extracted in the C:\SharePoint extract folder on your hard desk


CAUTION: do not use winzip or winrar (or any other software extraction tool because they usually break the folder structure and this may cause errors while installation. Trust me, I puzzled me initially and I lost some time getting an error stating that I do not have the right language on my system.
until I figured out that the installation file can’t find language setting for the WSS
• Find the config.xml file at:
\SharePointextract\files\setup
based on the command line I used, I should find the file in:
     c:\SharePointextract\files\setup\config.xml
• We need to edit the configuration file to allow for client install because out of the box, SharePoint can only install on windows Server OS.
Add the following line at the end of the file before the tag:
 • Save the file as config.xml in the same location.
Caution: Make sure the capitalization is correct
• The modified file should look like this:

• Follow the following link to install and configure IIS on windows 7 here.

1-Install the following additional prerequisites:
Microsoft FilterPack 2.0. At a command prompt, type the following:
c:\ SharePointextract \PrerequisiteInstallerFiles\sync\Synchronization.msi
(where c:\ SharePoint extract is the location where you extracted your SharePoint.exe)
2- Download and install the Microsoft Sync Framework 2.0 Redistributable Package here
Make sure that you select the right set of files that corresponds to your machine.
3- Download and install the Windows Identity Foundation
4- Install the SharePoint Foundation by running the command:
c:\ SharePointextract \setup.exe
(Again, where c:\ SharePoint extract is the location where you extracted your SharePoint.exe)

I will detail the installation process in the next blog.

Create a development SharePoint 2010 Environment Part 1: Installing software requirements for SharePoint foundation on Windows 7:

When you try to install SharePoint foundation on Windows 7, the installer will check for the prerequisites and will not install unless these features re installed. That will not be a problem when you are installing on a Windows 2008 server because you will have the option to run the prerequisite installer. But running the install pre-requisite option (Prerequisite.exe) on windows 7 will not run. Also, you must install SQL server before installing SharePoint Server but if you are installing the SharePoint Foundation, you do not need to worry about the SQL Server as the SharePoint Foundation installation will install configures SQL Express 2008 during the installation process. To prepare you windows 7 machine for SharePoint Foundation installation, I recommend following these steps:

Configure IIS by following these steps:


1- Go to control panel then select Turn Windows features on or off under the Programs and Features group.


2- Go to the Internet Information Services section of the Windows Features dialog box
3- Expand the Web Management Tools, then expand the II6 Management Compatibility section. Make sure you have the same configuration as the figure below:
4-Now expand the World Wide Services section and the Common HTTP Features sections: Configure these sections as figure below:


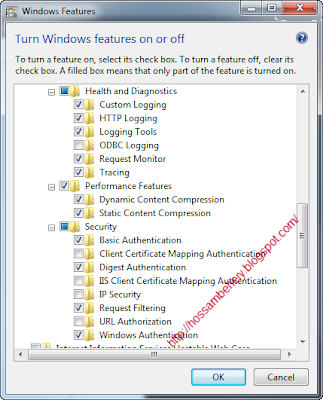
5- Expand the Health and Diagnostics section, the Performance Features and the Security Features then make these sections as figure below:


6-Click ok, Windows will install the features as shown below:


Then you will need to restart for the new configuration to take effect.
At this point your machine is ready to install SharePoint Foundation as I will explain in my next blog.


Thursday, July 22, 2010

Retrieve the passphrase in SharePoint 2010

Adding another server to a SharePoint farm is an easy task if you have the Passphrase that were used to create the farm initially. This “Passphrase” is needed to be able to add a new server to the farm. I have not seen any way to retrieve the passphrase if you forget it, this is where PowerShell can help you rest the Passphrase.


Just make sure that:
1. The account that you are using has the right privileges Securityadmin server role access on the SQL instance and the db_owner role in a database.
2. Administrative permission on the local computer.
• From your Start menu select “SharePoint 2010 Management Shell” or Start, “Microsoft SharePoint 2010 Products”, “SharePoint 2010 Management Shell” then click run as administrator to cover the second requirement above.
• Type the following command:
$passphrase = ConvertTo-SecureString -asPlainText -Force

This line will prompt you for a password and then stores the secure version of your password in the $passphrase variable.


Type the string that you want to use as your passphrase; I used “changePassPhrase” as an example as shown above.
Now type the following command:

Set-SPPassPhrase -PassPhrase $passphrase -Confirm

Then you need to confirm the passphrase and then ask you if you are sure that you want to change the passphrase to the password you typed.


After that, you can join your new server to the farm using the passphrase that you just updated.

Friday, April 16, 2010

SharePoint 2010 RTM Released.

The SharePoint team just announced the release of the release-to-manufacturing (RTM) for Office 2010, SharePoint 2010, Visio 2010 and Project 2010.


On April 27, the volume License customers with active Software Assurance (SA) on these products will be to download the product. The public release t will be on May 12th .

Thursday, March 11, 2010

Publishing InfoPath Form to SharePoint Server - URL not valid

I was trying to publish some Infopath forms this week and I got an error “ the following URL is not valid” I searched for info trying to figure out the reason for the issue and there were many different solutions to the problem. Here is a list of what I found from different sites – None worked for me:

1- http://sharepointcoding.wordpress.com/tag/infopath/
I already have a site at the root so that was not the solution for me.
2- http://littletalk.wordpress.com/2008/04/24/publishing-infopath-to-sharepoint-the-following-url-is-not-valid-error/
Same as above.
3- http://www.sharepoint-tips.com/2007/02/publishing-infopath-to-sharepoint.html

Although Ishai is suggesting that you should stop the Event Notification service on the server before you publish then re-start it again as soon as you finish publishing, I did not want to stop the service. This is because the service is running on a production server and there are other related services that require the System Event Notification service to be running.


What resolved the solution in this case is the following method:

By comparing two servers, the non-working site had this missing host header line item. The
X-Powered-By: ASP.net
was there in both site but the non-working site was missing the
MicrosoftSharePointTeamServices: 12.0.0.xxxx (depending on the service pack version)
By comparing the other sites on the non-working server I was able to get the correct value for the service pack in my case it was 12.0.0.6219.


Now the server is fixed but the client machine still needs to update a few keys in the registry so that it can find the server. To do this, regedit.exe and find the key: HKEY_CURRENT_USER\Software\Microsoft\Office\12.0\Common\Internet\Server Cache\
Delete entries for nonworking site (they are in this format
http://theNon-WorkingSiteName)
(You can also Version DWORD to c (12) but it is better to delete all the keys so that the next time you connect, these keys will be updated)

Friday, March 5, 2010

The Microsoft SharePoint Team just announced the release of SharePoint 2010.

The Microsoft SharePoint Team just announced that the official release of SharePoint 2010 and Office 2010 on will be on May 12, 2010 with The release to Manufacturing sometime will be sometime in April.

The original blog post is up at : http://blogs.msdn.com/sharepoint/archive/2010/03/05/sharepoint-2010-office-2010-launch.aspx

Tuesday, February 9, 2010

MOSS Certification Exam

I finally decided to take one of the MOSS certification exams (Exam 70-630 TS: Microsoft Office SharePoint Server 2007, Configuring). Passing it qualifies you to be a "Microsoft Certified Technology Specialist: SharePoint Server 2007, Configuring". I have been planning to do that for the last two years but never got around to it. It was a strange timing because I am also enrolled in McIntire School of Commerce; UVA for a Master degree in IT Management and this is a very busy time at the end of Module 3. Starting the 15th of February, we will start the residency at Charlottesville and deliver our Module 3 project.

Sunday, September 20, 2009

Adding the pdf icon to WSS or MOSS implementation.

These steps will add the pdf icon to any pdf document in document libraries.

Steps:

  1. Save the following icon as pdficon.gif or download an icon from: http://www.adobe.com/misc/linking.html

    2- Make sure that you download the 17 x 17 icon.

    1. Add the PDF icon. “pdficon.gif to C:\Program Files\Common Files\Microsoft Shared\Web Server Extensions\12\Template\Images
    2. open with an xml editor Docicon.xml file located in C:\Program Files\Common Files\Microsoft Shared\Web Server Extensions\12\Template\xml
    3. Within the tag add the following Mapping tag


    Make sure it is in alphabetical order and the value equals the name of the icon file.

    4. Save the Docicon.xml file
    5. Restart IIS.
    6. Check a document library you should now see a pdf icon next to all pdf documents.


Configuring WSS search to index pdf files, (installing and configuring pdf ifilters

Configuring WSS search to index pdf files, (installing and configuring pdf ifilters Pdf documents are used in many organizations as much as office documents, yet MOSS or WSS 3.0 does not support searching for these documents. In order to enable sharepoint search service to index and include pdf documents in the search results, pdf ifilters must be installed. The following steps explains how to configure the ifilters for WSS 3.0. Please note that this is for the 64 bit OS but the same steps will apply for 32 bit OScas well, the only difference is that you will need to download the correct ifilter in step 2 1. Follow the instructions to add the pdf icon to the WSS front servers. 2. Download and then install the Adobe PDF IFilter 9 for 64 bit platform from the following Adobe Web site: http://www.adobe.com/support/downloads/detail.jsp?ftpID=4025

For 32 bit:
http://www.adobe.com/support/downloads/detail.jsp?ftpID=2611

(Please note that the pdf ifilter is included in iFilter functionality is now bundled within the Acrobat and Reader products so if you installed any version of Acrobat starting version 7.0.5 then the ifilter is already installed)
3. Extract the contents of "PDFiFilter64installer.zip" to your local drive.
4. Double click "PDFFilter64installer.msi" to launch the installer.
5. Follow the instructions in the installer wizard to complete the installation
6. Once you’ve installed the IFilter on your WSS 3.0 server, and then follow the instructions below:
The following is a copy of the Microsoft KB Article 927675 that details the instructions needed to edit the registry settings.
1. Add the following registry entry, and then set the registry entry value to pdf: HKEY_LOCAL_MACHINE\SOFTWARE\Microsoft\Shared Tools\Web Server Extensions\12.0\Search\Applications\\Gather\Search\Extensions\ExtensionList\38
To do this, follow these steps:
a. Click Start, click Run, type regedit, and then click OK.
b. Locate and then click the following registry subkey:
HKEY_LOCAL_MACHINE\SOFTWARE\Microsoft\Shared Tools\Web Server Extensions\12.0\Search\Applications\GUID\Gather\Search\Extensions\ExtensionList
c. On the Edit menu, point to New, and then click String Value.
d. Type 38, and then press ENTER.
e. Right-click the registry entry that you created, and then click Modify.
f. In the Value data box, type pdf, and then click OK.
Verify that the following two registry subkeys are present and that they contain the appropriate values.

Note These registry subkeys and the values that they contain are created when you installed the Adobe PDF IFilter on the server.
o HKEY_LOCAL_MACHINE\SOFTWARE\Microsoft\Shared Tools\Web Server Extensions\12.0\Search\Setup\ContentIndexCommon\Filters\Extension\.pdf
This registry subkey must contain the following registry entry:
Name: Default
Type: REG_MULTI_SZ
Data: {4C904448-74A9-11D0-AF6E-00C04FD8DC02}
o HKEY_LOCAL_MACHINE\SOFTWARE\Microsoft\Shared Tools\Web Server Extensions\12.0\Search\Setup\Filters\.pdf
This registry subkey must contain the following registry entries:
Name: Default
Type: REG_SZ
Data: (value not set)
Name: Extension
Type: REG_SZ
Data: pdf
Name: FileTypeBucket
Type: REG_DWORD
Data: 0x00000001 (1)
Name: MimeTypes
Type: REG_SZ
Data: application/pdf
Upload the PDF documents to the Windows SharePoint Services 3.0 Web site.
Stop and then start the Windows SharePoint Services Search service. To do this, follow these steps:
. Click Start, click Run, type cmd, and then click OK.
a. Stop the Windows SharePoint Services Search service. To do this, type net stop spsearch at the command prompt, and then press ENTER.
b. Start the Windows SharePoint Services Search service. To do this, type net start spsearch at the command prompt, and then press ENTER.
c. Type exit to exit the command prompt.
Final Note:
You will need to restart a full crawl if you added any PDF documents to the site before you installed the Adobe PDF IFilter on the server. To do that use STSAdm, use the following command

Stsadm -o spsearch -action fullcrawlstart,

This will allow the Windows SharePoint Services Search service crawls the existing PDF documents again.

Monday, July 13, 2009

Office 2010 is offered on the Web


It seems that Microsoft is moving to the Cloud offerings as expected. Microsoft has announced that the next version of Office will include Web-based versions of Word, Excel, Powerpoint, and OneNote. Microsoft has offred Exchange and SgarePoint on the web a few moth ago. Offering office 2010 as a free service does not mean that the desktop version will not be available, Microsoft will still provide the desktop version that includes more features than the what they are offering on the cloud. This is in addition to Microsoft Live Office Workspaces, which lets users of the desktop Office suite collaborate online, Office Web Apps will be full lightweight versions of the products, allowing users to create, edit, save, and share docs on the Web. And, like obvious competitor Google Docs, Office Web Apps will be available for free.

“Office Web applications will be available in three ways: through Windows Live, where more than 400 million consumers will have access to Office Web applications at no cost; on-premises for all Office volume licensing customers including more than 90 million Office annuity customers; and via Microsoft Online Services, where customers will be able to purchase a subscription as part of a hosted offering.”
Following Google Docs, which requires a Google account, Microsoft will require Microsoft Windows Live account in order to use Office Web Apps. Microsoft says that the new version of Office and its accompanying Web version won’t be available until the first half of next year but Microsoft launched a preview site and a series of videos.
One change for Microsoft Office 2010 is Groove that now has a new name: Microsoft® SharePoint Workspace 2010. This reflects the focus of Microsoft on SharePoint as their fastest growing product ever and their focus on expanding the integration between Office and SharePoint. The change involve more than just having a new name, SharePoint Workspace 2010 expands the boundaries of collaboration by offering fast access, online and off, to all SharePoint content. Synchronize SharePoint libraries and lists to your computer with just a few clicks, and then easily update documents and forms offline.