One of the options that developers have while working with SharePoint is to use InfoPath forms and custom workflows. Another advantage is the ability to use InfoPath to integrate with SharePoint to provide a riche web forms that can be configured to enhance the user’s experience by setting default values and using filtering and views. The challenge in this scenario is not in the ability of handling the forms on the server (which is managed by the SharePoint when using web enabled forms) but with how the user who does not have InfoPath client installed interacts with the task e-mails sent for the workflow tasks. For example, look at the first link in the e-mail and you will quickly notice that it has an .xml extension.

If a user clicks on the link, the form will be downloaded and if the user does not have InfoPath installed on the machine, then the user will not be able to review the document.
In the following text, I will provide a very simple solution to this problem so that the user is presented with a link that opens the form on the server directly.
Here are the general steps involved:
1- We will create a custom task list to separate any tasks created by the work flow from other site tasks.
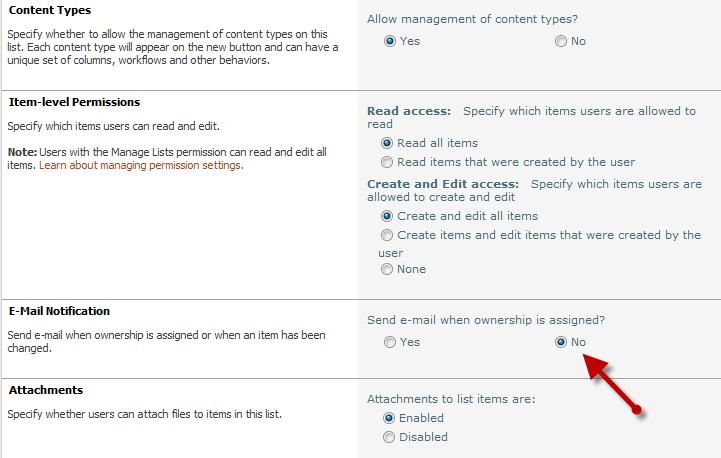
2- Go to the custom task list you created in step 1 and disable the custom task sending the e-mail
List settings --> Advanced settings then under E-Mail Notification
3- Select No for send e-mail when ownership is assigned?
4- Create a workflow that sends the e-mail notification for the form.
Below is a sample workflow I created for this demo:
The first action in the workflow is to create a variable to the URL of the form. To do this, select set workflow variable from the Actions menu.

5- On the variable name, select create a new variable and give it a name, in this case I named the variable FormURL.

6- In the value part of the action, click the Formula button and set the values of the look up as shown below:
Data Source: Form Library (the name of your form library)
Field from source: Encoded Absolute URL
In the “Find List Item” Section of the look up, select:
For the field: ID
Value: click the Formula button, and then set the values to:
Data Source: current item.
Form From Source: Workflow Item ID.
What we have done in this look up is to get the absolute URL for the item in the form library by whose ID matches the custom task list that has the matching Item ID.
The lookup should look like the figure below:

To explain this, when a task is created in a task list, the workflow adds 3 fields to the task
Workflow Item ID (the ID of the item that the workflow was initiated from- in this case the form item)
Workflow List ID (the ID of the List where you can find the item that the workflow was initiated from
-in this case the form library)
Workflow name: The name of the workflow that created the task in the task list
7- Once you have set up the variable as shown in the figure, you have the URL of the specific item you need.
8- Next, add send e-mail action (do not configure it now, we will configure it later)
9- Now open a form from your form library and copy the URL from the browser address
The URL will look like this:
10-Now remove the section in red (between location=) and (source) and add
Name of document to create a hyperlink using the document name.
11- And add [Document URL look up] instead. The code should look like the lines below:
12- Now, go to the send e-mail action that you created before and select it (do not double click to open it)
13- Once it is selected, go to the ribbon and select advanced properties
14-Select the body by clicking the button as shown below

15-Paste the code from the note pad
16-Replace the [Document URL look up] by selecting the text then click the ADD or Change Lookup button.
17-In the Lookup, select Workflow variables and parameters as the data source and the FromURL variable you created earlier.
18-Now the final step here is to replace the Name of document with a look up to the document name as follows:
Data Source: Form Library (the name of your form library)
Field from source: Name
In the “Find List Item” Section of the look up, select:
For the field: ID
Value: click the Formula button, and then set the values to:
Data Source: current item.
Form From Source: Workflow Item ID.
As you noticed, the setup is the same as the first look up but this time we selected the Name from the Form Library.
19-Now, set up your workflow to start automatically when Item is created.
You can customize your e-mail further and add company logo or any other html formatting that you need.
Great idea.
ReplyDeleteGreat post. This will meet a requirement that all our e-mail notifications must have our company logo. THANKS!
ReplyDelete